
 This home in Bowie, Maryland had a significant moisture
problem in the attic; in fact, on a cold winter day in January, the subroofing on the north side
of the house was covered in ice. To get rid of the moisture permanently, we'll be adding metal ridge vent at the
peak, and the Edge soffit ventilation at the eaves. This home in Bowie, Maryland had a significant moisture
problem in the attic; in fact, on a cold winter day in January, the subroofing on the north side
of the house was covered in ice. To get rid of the moisture permanently, we'll be adding metal ridge vent at the
peak, and the Edge soffit ventilation at the eaves. |
Metal
Ridge Vent Installation:

We will start by removing the ridge shingles and
eventually cutting a 2.5" slot in the 1/2" CDX plywood at the peak.
|

Since there are 2 layers of existing shingles on the roof,
we will be cutting through about 8 layers of shingles to get to the plywood. |

Why 8 layers, you ask? Well, there are two shingles per
layer that need to be cut, so technically, that's 4 shingle cuts per side -- however, the shingles
"lap over" to the other side at the peak. That's a LOT of cutting! |

OK, we're down to the plywood. Time to cut the plywood. |

There is the evidence of the moisture ... the dreaded
mold. |
 |

Now for the ridge vent area over the garage. |
 |

To get a flat seal between the metal ridge vent and the
shingle surface, we have carefully cut some strips from spare 25 year shingles and nailed them in
place. |

The new metal ridge vents by Air-vent Inc have been set into
Geocel sealant and screwed down with glavanized roofing screws. |

Note all of the fasteners holding down the vent. |

The ridge vent fasteners use steel and neoprene washers for
sealing. |
The Edge Soffit Vent
Installation:

Now it's time to prepare the eaves for the Edge Vent.
Once again, 2 layers of shingles are coming off; approximately 4 courses from the gutter.
|

Next, our custom made 5" aluminum drip edge is installed
... |

... then the required 1" slot is cut right above the protective
aluminum. |

AND the Edge Vents are nailed into place with 3" roofing
nails. Nice! |

Finally with all of the Edge Vents in place, all we need is
a covering of "ice and water shield" and
then some Certainteed XT25 three tab
shingles. Next up, a video showing a roof job we completed in Potomac, Md - with some more
detail about the ventilation we're using here ... |
|
|
Soffit Ventilation
(additional):

After installing the ridge
vent, we needed to check the existing soffit ventilation to see if there was enough (or any)
present. YES, some was there, but not nearly enough ...
|

...so after performing some calculations, we figured out the
required amount of new soffit ventilation needed, and
installed the correction (above and below pics). |
 |

After all the lanced soffit panels were re-installed, we
custom formed a new section of white aluminum fascia to replace the old. Done! |

And finally, we corrected the last two leaky areas on the
roof; 1. heater exhaust base, and 2. pipe collar on fan vent. |

The roofing here wasn't installed very well ... |
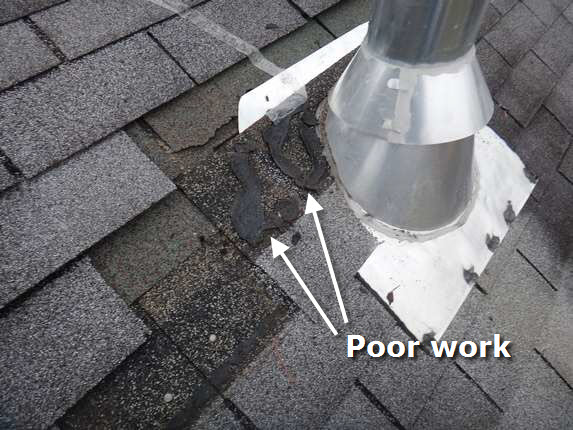
...so we removed the old shingles around the unit. |

Then, we installed new Certainteed XT25 shingles,and sealed
underneath with Geocel Tripolymer Sealant. |

OK, this leak is fixed! |

The pipe collar, installed by others, was done
incorrectly. |

OK, now we're in good shape! |

